Published on April 3, 2013
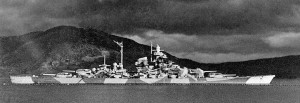
The German battleship Tirpitz, sister ship of the late Bismarck that had been sunk during an Atlantic foray intended to target Allied shipping supplying Britain, had been serving in the fjords of Norway since early 1942. Once there, its presence created a “Fleet in Being”, to use traditional Naval parlance, meaning that without leaving port, the Tirpitz tied down the bulk of the British Admiralty capital ships, which had to protect against possible forays into the North Sea. Thus, destroying the Tirpitz was a matter of highest priority — yet the ship had proven a difficult target, despite its large size. Even at anchor, camouflaged as it was and then covered with smoke screens amidst a field of heavy anti-aircraft artillery, it had been difficult to spot, much less successfully attack.
Nonetheless, some damage had been done with “Operation Source” in September 1943 when a Royal Navy special forces mission involving X Craft midget submarines had damaged the battleship by placing mines under the hull. Yet in an extraordinary feat of engineering, repairs had been completed in just six months by the German Navy, with the final work being finished on April 2, 1944. The British knew from ENIGMA intercepts that the ship was due to sail the following morning. A major air attack was planned on the ship before it could set out from its anchorage at Kaafjord on the north coast Norway. The attack was code-named, “Operation Tungsten”.
The Planned Attack
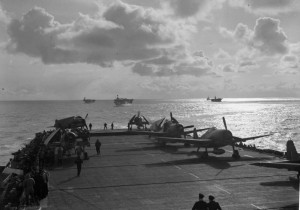
The Royal Navy and Fleet Air Arm had been assembling an attack and planning the operation for several months. No less than five aircraft carriers were slated for the mission, including the fleet carriers HMS Furious and HMS Victorious as well as three escort carriers, HMS Emperor, HMS Fencer, HMS Pursuer and HMS Searcher. Covering the British carriers were the battleships HMS Duke of York, HMS Anson and a light cruiser as well as five destroyers to protect from possible interception by the U-Boats of the German Arctic Flotilla. The target date had been set for April 4, 1944, however, with the ENIGMA intercepts, the date was moved up 24 hours.
Aircraft assigned to the mission included two waves of 21 Fairey Barracuda dive-bombers (on the day, only 20 would be able to fly). Each of the bombers would carry either a 1,600 pound armor-piercing bomb, General Purpose (GP) bombs or 500 pound semi-armor piercing bombs. To drive off any Luftwaffe fighters that might turn up to defend as well as to strafe anti-aircraft artillery emplacements and the Tirpitz’s own AAA guns, each of the two attacks would be covered by 40 fighters, Vought F4U Corsairs from the HMS Victorious and a mix of Grumman F6F Hellcats and Grumman F4F Wildcats from the three escort carriers. The two waves of Barracudas were scheduled to arrive one hour apart.
Surprise, coupled with the high number of bombers were to be the keys to success. In fact,, the British had learned from an earlier Soviet attack on the night of February 10, 1944, when 15 Soviet bombers had attempted to bomb the Tirpitz. They had failed miserably, despite that at the time the ship was immobile and undergoing repairs. The British too had experienced their own failures, so the Soviet experience was far from unique. To train, the pilots flew repeated missions over a Scottish training range called Loch Eriboll that born an uncanny similarity with the Kaafjord area — with enough training, it was felt that the attack would come off like clockwork. In essence, the operational team had learned with each failure — this time, they were confident of success.
The Attack Commences
ENIGMA intercepts had indicated that the Tirpitz was set to depart Kaafjord at 5:29 am on April 3, 1944, with the first predawn light of the Norwegian Spring. At that time, tugs were scheduled to help reposition and move the ship into the main channel from its protected anchorage area. Final photo reconnaissance flights by Spitfire PR flights that had been specially deployed to Vaenga in the northwest Soviet Union (with Stalin’s approval) filled out the target dossier with very detailed images. Meanwhile, undercover Norwegian agents from the resistance secretly reported from the nearby town on the progress of the German repairs and preparations to sail as well as locations of AAA sites on the shores.
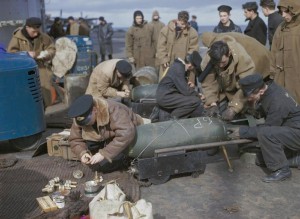
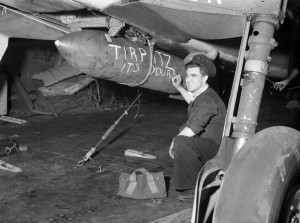
Overnight on April 2/3, 1944, the five British Navy aircraft carriers sailed within range to launch, hoping that if detected their presence would be confused with a protection mission to cover the sailing of convoy JW 58 from Loch Ewe, itself destined for Murmansk in the Soviet Union. Just after midnight in the early morning hours of April 3, the pilots were awakened, dressed and fed before a final briefing was held at 1:15 am. Meanwhile, the planes were armed — each of the bombs were chalked with messages from the squadron’s support personnel. The planes were spotted on the decks and prepared for launch. The pilots climbed aboard at 4:00 am.
At precisely 4:15 am, a mass launch was executed, rapidly putting all of the aircraft into the air. Form up was completed at extremely low altitude in the predawn light. By 4:37 am, the planes turned out for the run toward Kaafjord and their attack on the Tirpitz. The ship was just 120 miles distant. Flight times would be very short — approximately 15 minutes would be needed if they flew in a straight line, but instead, the force flew at 50 feet of altitude to stay under the German radars and crossed inland into Norway first as they climbed to higher altitude, then came back to attack from the “wrong side”, suddenly appearing over the mountains that surrounded the fjord to the land side.
Complete surprise was achieved as the first wave arrived at 5:30 am, precisely as planned just as the Tirpitz was being pushed from its anchorage by the tugs. Incredibly, the five German destroyers that normally ringed the Tirpitz and provided air defense had already departed ahead of the battleship, leaving the target largely unprotected. German radar stations detected the planes but the message was passed to the Tirpitz only minutes before the attack commenced — most of the Tirpitz’s anti-aircraft were not fully manned, watertight doors were still open and damage control teams were not assembled. The weather was perfect and the ship was fully exposed, still not underway. Finally, superior planning and carefully timed execution had truly combined to catch the Tirpitz at its most vulnerable moment.
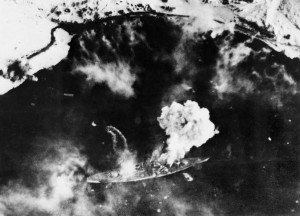
First Wave Attacks
The attack began with a lightning sweep by the Corsairs, Hellcats and Wildcats, which strafed the Tirpitz’s anti-aircraft batteries and control stations. Heavy damage was done and many of the gunners were killed. The Fleet Air Arm fighters, however, made a clean break and suffered no losses, such was the extent of the surprise achieved. Meanwhile, taking advantage of the fact that the AAA gunners had been concentrating on the attacking fighters, the 20 Fairey Barracudas of the first wave dove down from above and dropped their bombs from low altitude — a GP bomb, three of the large 1,600 pounders and three 500 pound bombs struck the Tirpitz’s decks, though none pierced the top armor. A trade off for accuracy meant that the bombs were dropped from lower altitude and thus did not have the penetrating power needed. Nonetheless, extensive damage was done.
Within 60 seconds, all 20 of the Barracudas had completed their attacks and turned sharply toward the aircraft carriers, racing home along with the fighters. It would take another ten minutes before most of the German AAA crews had made it to their guns — they found nothing to shoot at and many men dead at their stations. The first wave had been perfectly successful. At 6:17 am, all but one of the planes had recovered on board the five British aircraft carriers — the only loss had been a single Fairey Barracuda with its three crewmen — all killed.
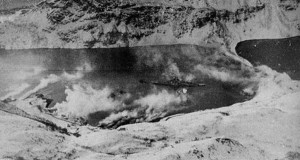
Second Wave Attacks
At 5:25 am, even before the first wave had arrived over Kaafjord, the aircraft carriers launched a second wave of 20 Fairey Barracudas and fighter aircraft. As the planes were forming up at low altitude, however, one of them crashed into the water, killing the three man crew. The 19 remaining Barracudas and 40 more Corsair, Hellcat and Wildcat fighters made their way to Kaafjord. An hour later, when they arrived over the Tirpitz, the Germans had yet to deploy an effective smokescreen to hide their prized battleship. The planes easily picked the great battleship out at the side of the fjord. This time, however, the Tirpitz’s AAA guns were completely manned and ready and the AAA fire was intense.
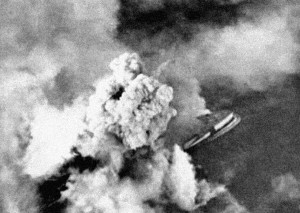
Again, the attack began with the strafing fighter planes that swooped down on the ship and shoreline AAA positions and strafed them mercilessly. Less than a minute later, the remaining 19 Fairey Barracudas dove down to drop their bombs. Almost immediately, however, one of the dive bombers was lost to AAA fire with all three of the crew killed. Some of the fighters too suffered damage, including one Hellcat which took considerable fire. As with the first wave, in just one minute, the second wave attack was finished and the planes had turned back out to sea and disappeared over the sea. In their wake was a further damaged Tirpitz — the second wave scored another several bomb hits, though the types and level of damage was harder to assess given the chaos created by the heavy AAA fire.
At 7:20 am, the second wave arrived and began landing back on their ships. One of the Corsairs suffered a landing accident and was written off. Likewise, the severely damaged Hellcat had to ditch since it could not attempt a landing given its condition. Both pilots survived.
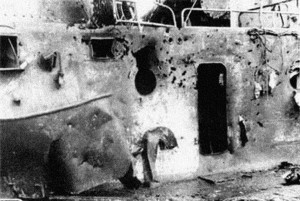
Aftermath
Although the British commanders considered launching an afternoon wave, ultimately they elected to return to Scapa Flow. They realized that the Germans were aware of their presence and would be even more prepared for any additional attacks. The fleet would return on April 6, having conducted services to honor the nine airmen who lost their lives in the attack (two from AAA and one in an accidental crash while forming up in the second wave).
As for the Tirpitz, the damage was significant but all repairable. None of the bombs had penetrated the top deck armor. Still, the repairs would require at least one or two months more, taking the Tirpitz out of action for awhile longer. This gave the Royal Navy time to prepare yet another series of air attacks on the Tirpitz, hoping that eventually they would be able to sink her and end the threat in the North Sea — but that is another story….
Today’s Aviation Trivia Question
Did the Luftwaffe have the aircraft in place in Norway to defend the Tirpitz? If so, what planes and squadrons?
